Hi Sisters!! Boni here with your weekly post. I have HUGE news
CSN Stores has amazing online stores where you can find anything from lighting to furniture to cookware. I love their amazing collection of online stores - wonderful for people who love shopping as much as I do! The great news is that the lovely folks at CSN are partnering with me in a giveaway - this time for our U.S., Canadian, UK, and Germany readers. Be sure to read through the entire post (it is somewhat lengthy but well worth the read) then leave me the necessary information in a comment below and be entered to win either $60 U.S./Canadian / 60 Euro UK / 60 Euro German funds from CSN sister sites. I will give you all the information you need if you are picked. Your gift certificate is good for use on any one of CSN's fantastic corresponding websites.
Now for the topic of the week - Taking the Best Photos of your Projects
DIY offers this perfect solution to an inexpensive light box.
Materials Needed:
1.) A Box – It could be any size you want as long as you can light it! I prefer it to be as square as can be. You can find boxes anywhere for free. I got mine from work in which they throw out anyway. You can also find boxes in the back of strip malls, grocery stores, appliance stores or basically any place that makes or sells products. Thicker the better! (Free)
2.) Fabric ‘ This again could be any type. In my box I used white muslin fabric that is found at your local arts and craft store. Buy enough to cover the entire box. (4.00$ US or 1.99$ a yard) People suggested other fabrics like White Nylon and white fleece. If your extremely cheap and have some white under shirts laying around. Cut up the sides to where you have two halves of the shirt. If you use multiple shirts, be sure that the color matches or your end result may not turn out as you like it
3.) Tape ‘ I use tape to secure the fabric to the sides of the box. Reason being is that In-case you want to try out different fabrics. I use regular masking tape. (1.00$ US A Roll)
4.) Glue ‘ You can use a “Glue Stick” (1.00$ US a Stick) or spray adhesive (5.00$ US per Can) to stick the lining in the box.
5.) White Bristol board ‘ This will line the inside of the box and will also serve as your back round (.50 a sheet X2). I would suggest to buy 2 or 3 sheets as you will be cutting up two to line your box (Could be more depending on the size of your box) and one for the back round. Bristol board is a heavyweight paper (.006″ Thick) that is used in drawing/art. The name came from where it was originated, Bristol England. If you wanted a different back round you can also pick up different colors.
6.) Lights ‘ You will need to light this box and this could be the most expensive part of the box unless you already have the lights. In my opinion lighting is the most important part of this box. Without it you will not get the picture you desire. I went to my local hardware store and picked up some “Daylight” Bulbs. Using regular light bulbs will cast a yellow light and should be avoided. I purchased “n:vision” 90 watt equivalent compact florescent bulbs ($7.00 US). Basically any “Full Spectrum” light bulbs will do.
Also suggest a lighting fixture. If you have a one of those desk work lamps, It will work fine. If you don’t I suggest getting a “Clamp On Work Light”. At my local home depot they only had two kinds, A smaller reflector dish (5″) for 5.99$ (US) or the 10.5″ reflector for 11.99$ (US).
Now that you have the Materials I will show you out to make a light tent step by step. When your done you can take nice clean and crisp product shots.
Step By Step Process:
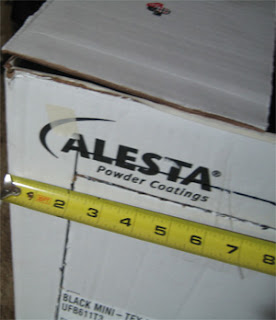
A) Take your box with a tape ruler and marker and measure in 2″ from the side of the box marking multiple points with your marker. When your done you will see your border, connect the points using your straight edge to where you should have a nice looking square/rectangle in the middle of the box with a 2″ border around it. Leave the top and bottom of the box alone as you will not need to mark it
B) Cut out the boxes you’ve drawn. Repeat that to the sides of the box where you have drawn the boxes. When you’re done, cut off the top of the box or remove the flaps on the top of the box. LEAVE THE BOTTOM INTACT!
C) Now take your Bristol board and make lines with your marker for every two inches 16 times. Then proceed to cut out 16 strips with your scissors.
D) Glue the paper strips into the box. Make sure the side with marker goes against the cardboard so it can not be seen.
E) Take another piece of Bristol board and cut is so the width is the same as the inside of the box and the length is much longer then the box.
F) Place the long piece of Bristol board into the box to where the piece curves to the bottom. Avoid creasing as it will show up in your photo. Cut off excess paper that is sticking out the top.
G) Cut your fabric to where it will cover the holes. Then cut a big piece to where it will cover the top of the box.
H) Tape the fabric to cover the holes in the box except the one that is facing your background. Then tape the top piece on.
YOU’RE DONE!
There are many variations you can do to get the photo you want. If you’re having a shadow problem I suggest lighting the other sides of the box. If you’re getting vignetting I suggest a lens hood or moving the lens more into the box. Photoshop could be a handy tool also! Since my lens and camera are not the cleanest I tend photoshop the dust that is sitting on or in my camera. I also adjust the levels so it’s brighter.
Camera sticking into the box
Read more: http://digital-photography-school.com/how-to-make-a-inexpensive-light-tent#ixzz0qZyH6W8v
Read more: http://digital-photography-school.com/how-to-make-a-inexpensive-light-tent#ixzz0qZy5nLAs
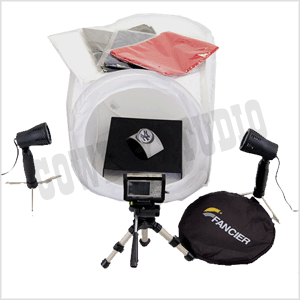
I personally have a photo tent after having utilitized the above referenced home-made tent. Santa Claus brought me a tent of my very own last Christmas and I have to say I love it. That's where CSN Stores comes in. CSN Stores has offered a $60 gift certificate for you to use in any of their online stores and you could use it to purchase your very own light tent from CowboyStudio (they are a CSN vendor) OR anything else that you may desire.
[CSN Stores] $60 U.S./Canadian/UK
Here's the challenge, it's an easy one this week:
Leave your best photography tip in a comment below and a random winner will be drawn on June 29th and posted on June 30, 2010.


8 comments:
Boni, this is terrific. I'm printing this out and my sweet honeybee will making me one! Thanks for the great tip!!!
Blessings,
Kim xXX
Wow Boni, awesome post and awesome prize!!!!!
Hugs
The pics don't work for me, but it's a fantastic tutorial even just as text - thanks, Boni! What a fantastic prize! I know we don't qualify, but my best photography tip - get a good camera and a program like Photoshop or Picassa!
I couldn't see the pictures earlier but just came back and they are there now. It's a big help to see them! Thanks for posting all that.
I don't see a Mr. Linky though!
Great tutorial. I usually take my artwork outside early in the morning before the sun comes out to take a picture.
I love your tutorial- will be making one of these! I am not an expert photographer- I have an OK camera...I turn of my flash when photographing my pictures- I usually craft late night, so no outdoor light when I take my pic's...and have also learned do not put the OTT light aimed directly at my card....
Thanks for a chance to win!
Hi Boni,
Great tutorial and giveaway! I don't see Mr Linky so I guess it's okay to leave my best tip here!
I have learned to try to take all of my pics by daylight if possible - I use digital camera and if the flash goes off, I always seem to get a hotspot - when I take my pics by daylight and avoid the flash they come out so much nicer!
Hugs
Ramona
http://create-with-joy.blogspot.com
Hi Boni,
I made one of these light tents its really I found these directions and I love it but I think I am like you going to get a light kit from Wolf Camera I love to take pictures of my projects and of my dogs, birds, ect.
check out what I have on my blog
http://luvmynikon.blogspot.com/
I like your blog background
Post a Comment